
Creating Art With Your Sewing Machine
- Create with RNK
- Mar 27, 2023
- 4 min read
Updated: Jun 8, 2023

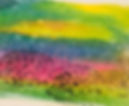
Hi, I’m Susan from Sewfeet.com and if you’ve been looking for something new to sew, I have something easy and fun to show you! I love to make mini art quilts using mixed media sewing techniques. I just finished one that features a new (to me) art technique, and I loved the way it turned out. This post is about a painting technique using fabric paints and Appli-Stick Fusible Web. The finished size of this piece is 8” x8”.My mini art quilts are usually a bit larger, from 9” x 12” up to 20” x 20”. This one is smaller because it started as a practice piece, but I liked it so much I decided to share it with you! I’m calling it Springtime Sparkles so let’s get started.
Supplies
Muslin square for the base fabric, 10” x 10”
Embellish Premium Fusible Batting, 10” x 10”
Backing Fabric, 9” x9”–I used a silk dupioni fabric for this
Four binding strips, 1 ¼” x 10”–I used the same silk dupioni as the backing
Appli-Stick paper-backed fusible web, 10” x10”
Fabric or acrylic paints–4 colors of your choice–I used Dye-na-Flow Fabric Paints
Paintbrush(es)–I used foam brushes,1 for each color–a regular paintbrush also works
Floriani 40-wt Embroidery Thread– one color that coordinates with the paint colors
Microtex Needle, size 80/12 or 90/14
3-4 colors of heavy decorative threads–I used Wonder-Fil Dazzle in colors similar to the paint colors
Non-Stick Presser Foot
Braiding Foot for couching
3-5 paper or fabric flowers with a small button for the center of each one
8 ½” x 11sheet of cardstock
Optional: Design stamp of choice with black ink plus 2-4 colors

Painting the Fusible Web

Prepare your painting surface by covering it with aluminum foil or parchment paper. This will protect your table as you paint. Place the Appli-Stick with the paper side down as you will be painting on the fusible side. Pour a small amount of each of your chosen colors onto a paper plate. The paints should be fairly thin, so adda small amount of water if needed to each color and stir each one stir to mix. Start with one color and paint the web as desired. Add the other colors as desired until the web is completely painted. Set it aside to let it dry. As it dries, you will start to see a glittering sheen across the web (hence, the name, Springtime Sparkles). Important Tip: It may be tempting to use the iron to help dry the paint, but don’t forget that you are painting on fusible web, which will melt with the heat.
Stamped Designs
When the painted fusible web is dry, add a layer of stamped designs if desired. Make sure the paint is dry or the ink will smear. I know this because I added some designs before the web was completely dry. The designs lost most of their definition, but they still create some visible texture. It just doesn’t have the graphic look I was going for.
Stitching the Fusible Web
Once the painted fusible web (and the ink if you stamped) is completely dry, it’s time to add stitching and embellishments. I like to do most, if not all of my stitching before I add the backing, so the back has a clean look. Insert a Microtex needle into your sewing machine and thread the machine with the embroidery thread. Fuse the batting to the wrong side of the muslin following the manufacturers instruction. Peel the paper from the painted Appli-Stick to expose the adhesive side. Smooth the painted web onto the muslin. Stitch lines of decorative stitches as desired. Sew open stitches (no satin stitches) using a non-stick presser foot. I stitched vertical lines, spacing and curving them as desired. Below is a photo of the back of the quilt batting so you can see the stitches better.

Adding Couched Threads

Change to a braiding foot. Thread a heavy decorative metallic thread into the hole of the presser foot. These beautiful threads add even more sparkle to the mini quilt. Set the machine for a narrow zigzag stitch (Width =2.5 mm; Length = 3 mm). Stitch lines of couched thread over the surface of the painted web as desired.
Embellishments
Arrange the flowers as desired and stitch a button in the center of each one to secure them. Download the color quote below. Print the quote on white cardstock. Cut it out-I used a decorative rotary cutter. Add a little color to the cardstock by lightly swiping colored ink pads across the surface of the card and along the edges. Attach the card to the front of the quilt by straight stitching across each of the four corners. Trim the embellished quilt top to be 8” x 8”.

Finishing
Trim the backing fabric to match the quilt top. Place the backing fabric wrong sides together with the top and pin or clip the edges. On a piece this small, you can stitch along all four edges to keep the layers together. Or, if you want a quilted look on the back, stitch from the front of the quilt and sew a few lines of straight stitching across the quilt to secure the layers together. Don’t forget that you have embellishments on the front that you will need to stitch around. I used a serpentine stitch, but a simple straight stitch will work. These additional stitches will blend into the front of the quilt and become part of the overall design.
Fringed Binding

Bind each edge of the quilt individually, starting with one of the side edges. Place the strip on the back of the quilt right sides together with raw edges even. Stitch it to the edge using a ¼” seam. Wrap the strip to the front and clip or pin it in place. Note: The raw edge does not fold under as it will be fringed. Stitch about 1/8”from the edge to secure the binding. Fringe the raw edges of the binding. Repeat this with the remaining threads. Note: The fabric I used was woven with two colors of thread so when I fringed the raw edge, it showed a contrasting color.
More Mixed Media Sewing

If you like this project,I have a FREE gift for you. Use your sewing skills to make unique works of art that only you can create. This mini course answers the question, “What is Mixed Media Sewing?” showing you ways to combine your sewing skills with art and scrapbooking techniques to create unique pieces of art. CLICK HERE to enroll in this FREE class.
