
Cushy Laptop Sleeve
- Create with RNK

- Aug 6, 2020
- 7 min read
Clarrisa made another back to school project, and this one may be our favorite! Follow her instructions below to make your own laptop case!

Every laptop is a different size. I will be giving you instructions to measure and create a laptop sleeve for your laptop.
Supplies:
Fabric- Generally a ½ yard or less will be sufficient for most laptops. Instructions are below for exact measurement. I used a heavier 45” fabric. Denim or a home decorating fabric would also work well.
Sport or Purse zipper- Length will depend on your laptop. Measure the width of your laptop and add 2”. Purchase the closest size with longer being better than shorter.
2 pieces of RNK Sew Fab Foam or Cosplay Super Structure Foam - The size will depend on the size of your laptop. You will cut these pieces the same size as the outside fabric which instructions are below.
Standard sewing thread to coordinate with outside fabric.
100/16 chrome denim needle
Quilter’s Select Glue Stick
Quilter’s Select 6”x24” ruler (if not embroidering)
Fabric Marker
Quilter’s Pins (usually longer pins)
Zipper Foot for your machine
Quilting Embroidery Design (optional)
Floriani Wet n Stick Stabilizer (optional)
Floriani Embroidery thread to coordinate with your fabric (optional)
Embroidery Bobbin thread (optional)
Measuring:
1. Measure all the way around the width and length of your laptop. Take a tape measure and
starting somewhere on the top, go all the way around the sides, back and then back to the
top where you began. Do this for both directions of your laptop.
2. Use those measurements, divide in half as we will be making this in 2 pieces and add 2” to
each measurement for seam allowances and a little extra room. My laptop width measured
32” all the way around, divide by 2=16”, add 2”=18”. My laptop height measured 21 ½”
all the way around, divide by 2=10 ¾, add 2”=12 ¾”. DON’T CUT YET. See next step.
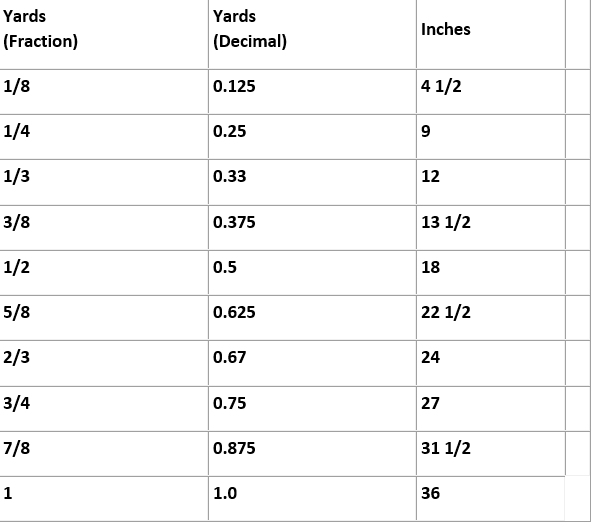
See above chart for decimal and inch equivalencies for fabric measurement.
3. We will be quilting the front and back of the sleeve by either embroidering or straight line
quilting. This tends to “draw up” the fabric and Sew Fab Foam so you may lose some of
the width and height of your measurements. As a result we need to cut the fabric and Sew
Fab Foam a little larger and trim to right size when we are done quilting. To the width and
height you need to add 1 ½”. My width measurement ended up being 18” from the
measurement in step 2, add 2”=20”. My height measurement was 12 ¾” from above, add
2”=14 ¾”. I would cut my fabric and Sew Fab Foam, 14 ¾”x20”.
Cutting and Prepare fabric:
1. Cut 2 pieces of your outside fabric the measurements calculated above.
2. Cut 2 pieces of RNK Sew Fab Foam or Cosplay Super Structure Foam the size of the
measurement calculated above.
3. Fuse RNK Sew Fab Foam or Cosplay Super Structure Foam to the back of your Fabric.
Fuse from the fabric side.
Embroidery: (optional)
1. Choose a “quilting” embroidery design. You will use your design to quilt the entire front
and back so it needs to be as big as you can embroider it.
2. In your software, enlarge your design to fit your largest hoop.
3. In Floriani Total Control Software I also took the running stitch that made up my design
and changed the running stitch in the design to a “bean” stitch. A bean stitch repeats
each stitch in odd numbered multiples. Once you have the run stitch in your design
selected, select the “commands” tab in the running stitch property box. It is the tab that
has the running stitch with a plus next to it.
Use the drop down arrow next to “bean style” and select “bean”.Change the repeats to 5 and click “Apply”. Each stitch will now be repeated 5 times. This way you can see the stitching better on a print fabric. Make sure to save your design.
4. I also found it very helpful to baste the fabric/Sew Fab Foam to the stabilizer when I
embroider. Even though the Wet n Stick is very sticky, the Sew Fab Foam wants to lift away
from the stabilizer especially around the edges of the hoop. You can either baste using the
function of your machine or you can add a baste stitch in your software.
It’s very easy in Floriani Total Control to add a baste stitch.
· Select the “Program Preferences” icon on the top tool bar.
· Select the “Auto Baste” tab. Make any adjustments you want to your baste stitch. You can
choose to add cross hairs to mark centers, adjust the stitch length and adjust how far away
from your design you want to baste. If you have resized your design to fit your hoop you
would set the “baste past outer edge of design” to zero.
· Go to “tools” in the upper left corner and select “Auto Baste”. A basting stitch will
automatically be added around your design with your settings made in program
preferences.
5. On the side with the Sew Fab Foam or Cosplay Super Structure Foam, mark a vertical and
horizontal center on both of your fabric/Sew Fab Foam pieces. (backside)
6. Hoop a piece of Floriani Wet n Stick stabilizer glue side up. The glue side is the rough
side. Dampen the glue with a little water and spread the water around until the surface
becomes sticky. Don’t use too much water or it won’t stick.
7. Fold one fabric/Sew Fab Foam piece on either the marked vertical or horizontal line on
the back and hold over the Wet n Stick. Using the marks on your hoop and the marks on
the back of your fabric/Sew Fab Foam piece, match the vertical and horizontal centers and
stick your piece down. It doesn’t have to be perfect as you have a little wiggle room
because you cut your piece a little larger.
8. Baste the fabric/Sew Fab Foam piece to the stabilizer and embroider your design.
9. Measure the width and length of the box created by basting and mark the centers each
direction. The width on my basting measured 14” so 7” would be the center. Remove
from hoop.

10. Trim all thread tails and jump stitches on the back. Dampen the back to loosen the glue of the Wet n Stick and tear away the Wet n Stick.
11. Repeat for other fabric/Sew fab Foam piece.
Straight Line Quilting: (if you aren’t embroidering)
1. Place the Quilter’s Select ruler 45 degree angle marking on one straight edge of one of the fabric/Sew Fab Foam pieces.

1. Using your fabric marker, mark a line at the 45 degree angle on your piece.
2. Move the ruler 2” away and mark again. Continue making marks 2” apart on the entire
piece.
3. Turn the ruler and fabric/Sew Fab Foam piece and mark a 45 degree angle in the opposite
direction. Continue making marks 2” apart going the opposite direction on the entire
piece.
4. Using a Standard Sewing thread, stitch on marked lines.
5. Repeat for other fabric/Sew Fab Foam piece.
Cut Fabric/Sew Fab Foam pieces to size:
1. Fold each fabric/Sew Fab Foam piece in half horizontally and vertically and mark centers
with small marks. Mark at both ends of the horizontal and vertical centers.
2. Measure to the left or right of the vertical center marks, half the distance of your finished
width measurement. My width measurement is 18” (Step 2 in the measurement section
above) finished so I would measure 9” from the center and cut. Measure over 9” the other
direction and cut again. You have an 18” wide piece. Repeat for the other direction.
3. Use a round object as a template to cut the curves on all 4 corners. I used a cone spool.
Find something round to trace that isn’t too large. Place the round object in a corner, trace
the curve and cut out the curve. Repeat for all corners on both pieces.

Zipper:
1. Fold zipper in half matching the top and
bottom zipper stops. Mark the center
on both zipper tapes.
2. Using your Quilter’s Select Glue Stick,
run a line of glue on one half of the top
edge of one of the fabric/Sew Fab
Foam pieces. Matching the marked
centers of the zipper and fabric/Sew
Fab Foam piece, glue one half of the
zipper to the top edge, right sides
together.
3. To glue the zipper around the curved
end of the fabric/Sew Fab Foam piece
you will need to clip the zipper tape
about ¼” deep at the curve about every
½”. Don’t clip too deep!
Glue zipper around curve. Repeat and glue other half of the zipper to the top edge.

4. Attach the zipper foot to your machine in the right position. Place the needle in the far left position.

5. Thread your machine with the Standard
Sewing Thread and insert a 100/16
denim chrome needle.
6. Stitch your zipper to the top edge of
the fabric/Sew Fab Foam piece. The
edge of your zipper foot will be right
next to the zipper teeth. Begin and end stitching at the zipper stops. Leave the zipper
tape at the beginning and ending unstitched. If the zipper pull gets in the way, move it
away from where you are stitching.
7. Select a zig zag and widen to the widest setting. Edge finish where you stitched the zipper.
8. Clip “V” shaped clips around the curve where you clipped previously.

9. Move zipper foot to the left position and the needle to the far right position. If your machine has a “needle down” setting, set your needle to stop in the down position.
10. Turn zipper away from the fabric/Sew Fab Foam piece and fold the seam allowance toward the fabric/Sew Fab Foam piece. Edge stitch where the fabric/Sew Fab Foam is folded.
Take your time around the corners. Take a few stitches and then push the fabric/Sew Fab Foam away from zipper and stitch again.
11. Repeat steps 2-10 for the other side of the zipper. This side may be a little trickier as you
have the first piece attached. Take your time. You will work with the first piece with the
zipper attached, on top, right side down and the unstitched piece on the bottom right
side up.
Construction:
1. UNZIP ZIPPER about half way.
2. Place both fabric/Sew Fab Foam pieces right sides together. Line up edges and pin
together using the long Quilting pins.
3. Attach a standard stitching foot. Using a ½” seam allowance, begin stitching at the center
bottom. Stitch around the corner toward the zipper stop. Turn excess zipper tape at zipper
stop away from the fabric/Sew Fab Foam pieces and stitch as close as possible to where
the zipper was originally stitched in. Backstitch. Your stitching will end about ¼” away from
the original zipper stitching. Repeat for other side.
4. Using a wide zig zag, edge stitch around entire raw edge.
5. Clip “V” shapes in bottom 2 corners.
6. Turn right sides out through the open zipper.
7. Press stitched edges flat.


love QS rulers....need o make one 2.5in wide & 32in long to make jelly roll strips