
Log Carrier
- Create with RNK

- Aug 12, 2020
- 3 min read
"A camping we will go, a camping we will go, hi ho the Derry-O. A camping we will go."
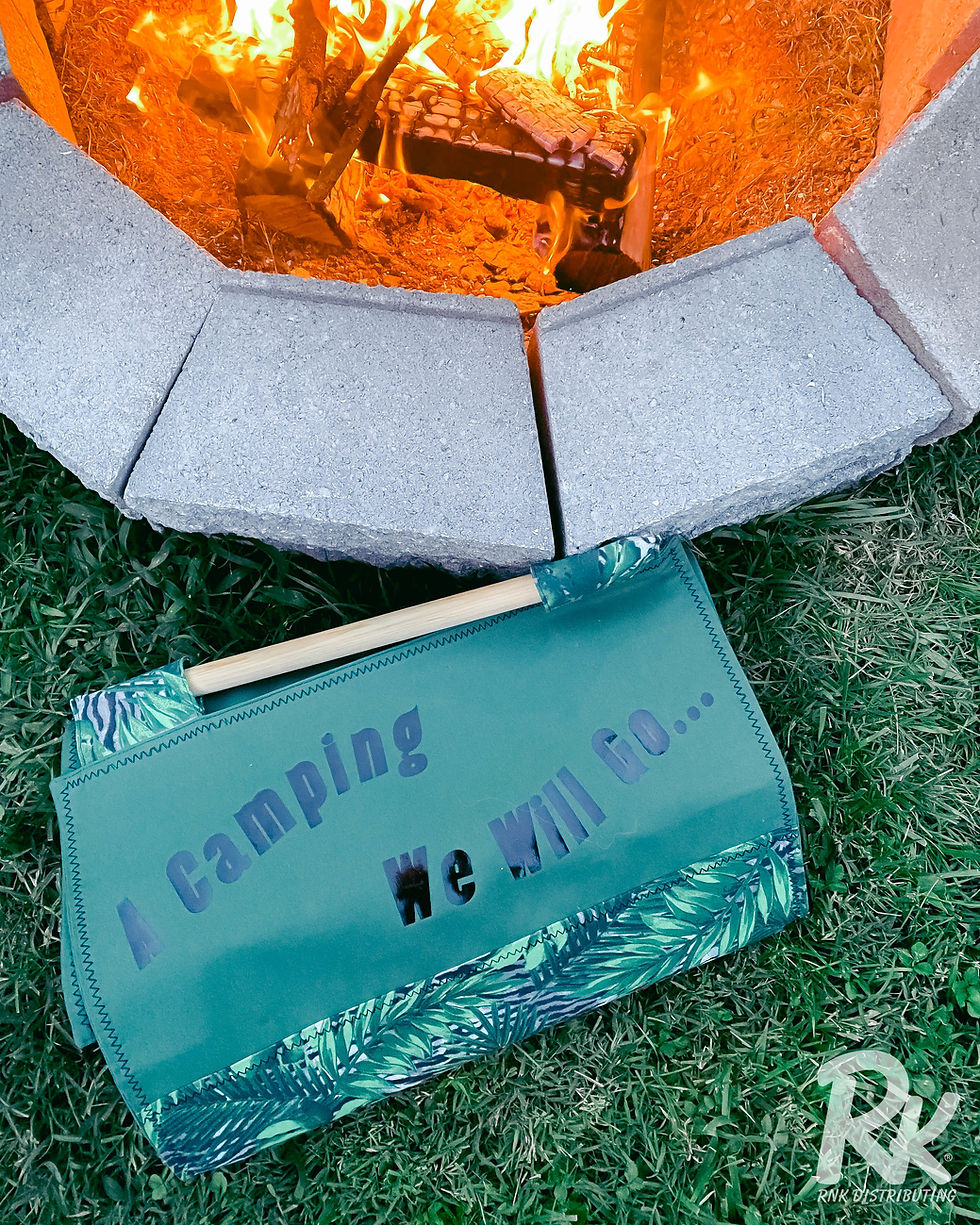
Well, it's camping week! And we are so jolly about this project, that we are even singing! Clarrisa made this adorable project, and we are obsessed! In fact, we even took it to our own camp fire to see how sturdy this project truly is.. Let me tell you, it's sturdy!
Follow the video below for a tutorial, or the written instructions below the video
Supplies:
2/3 yard of 60” wide solid fabric-I used canvas
2/3 yard of 60” wide print fabric-I used Home Dec outdoor fabric
100/16 Chrome denim needle
Standard Sewing thread to coordinate with fabrics
2 pieces of 15 ¼”x ¾” wood dowel
Fabric MarkerEmbellish Heat Transfer Foil(optional)
Embellish Vinyl Weeding Tool-This a really cool tool if you do a lot of digital cutting!https://rnk-embellish.com/products/Embellish-Tools/Embellish-Vinyl-Weeding-Tool(optional)
Quilting Straight pins-These are longer pins
RNK Turning Tool
Cutting:
By the way, if you haven’t tried the Quilter’s Select Rulers, Mats and Cutters you’re missingout. They are amazing and make cutting easy! https://quiltersselect.com/products/Select-Tools/
From solid fabric cut-Two pieces 10”x 20” and one piece 20”x 38”
From print fabric cut-One piece 19 ½”x 20”and eight pieces 4 ½”x 6 ½”
Cut two dowel pieces 15 ¼”long
Keep in mind that 20” is the measurement for the width of the log carrier.
Digital Cutting: (optional)
1. I love Craft n Cut software for designing files for digital cutting. If you have Craft n Cut I created the lettering using the “Ossington” font, 1.75 inches tall and I used the “wave” in the Path shapes. “Wave” is the last path in the shapes.
2. I then selected the lettering, right clicked and “Breakup Text”. I broke the text into 2 pieces. That way it would fit on my cutting mat. Make 2 sets of lettering.See Video

3. Cut with your digital cutter.
4. With your scissors, rough cut into 4 pieces.
5. Using the Embellish Vinyl Weeding Tool, weed out the extra vinyl.
6. Save Vinyl lettering until the end to fuse to the log carrier.
Construct Handle Holders:
1. Install the 100/16 chrome denim needle and thread top and bobbin with standard sewing thread.
2. Place two 4 ½”x6 ½” pieces right sides together. With a ¼” seam, stitch down the 2 long sides leaving the ends open. Repeat for remaining pieces.
3. Turn right sides out and press flat. To make a crisp edge, roll one layer out past the seam, turn the seam allowance inside to one side and press the seam allowance flat. You may put a little crease in the fabric underneath but you can press that out. See the photo. Fold along the seam allowance and press flat.

4. Edge stitch one long side of each handle holder.
5. Fold one handle holder in half narrow end to narrow end. Edge stitch through all layers of the unstitched side. This will stitch one side closed. Repeat for other 3 holders.
6. Mark ¾” away from the raw edge of each handle holder.
7. Put handle holders aside.


Construction:
1. Using a 3/8” seam, stitch one solid colored 10”x20” piece to printed 20” edge. 20” edge to 20” edge. Repeat for other end of printed piece.
2. Press seam allowances toward printed fabric. Edge stitch along seam on printed fabric with a decorative stitch or a straight stitch. If using a decorative stitch choose a stitch that moves forward easily. The fabric is thick and can get stuck if your stitch is too intense.
3. Place 20”x38” solid piece on top of the print/solid piece you just created. Pin along long sides using quilter’s pins. If you need to, trim edges of solid piece to fit top.
Mark 1 ¼” from raw edge of each long side. See photo.
4. Mark 1 ¼” from raw edge of each long side.See photo.
5. Use a 3/8” seam. Start stitching at the mark, off the edge of the fabric, 3/8” into fabric, backstitch and turn onto 3/8” seam allowance. Pivot at corner and continue stitching to other end and repeat stitching pattern. See photo


6. Clip all corners at a 45 degree angle, turn right sides out and push corners out with the RNK Turning Tool.
7. Press edges flat using the technique in step 3 in “handle holder construction” above. Press under raw open edges of ends 3/8” on both the top and bottom fabric.
Handle Insertion:
1. Slip a handle holder over each end of a dowel.3/4” mark on handle holder should be on top. If it isn’t remark.Repeat for other handle.

2. Slip handle assembly into open end of log carrier to ¾” marking on handle holders. Pin holders into the opening and pin across open end.

3. Edge stitch handle holders and open end closed.
4. Top stitch around entire edge with either a straight stitch or a decorative stitch.
Vinyl Lettering: (optional)
1. Arrange lettering on the solid sections at the top of the log carrier.
2. Press Vinyl to fabric. Let cool and remove top carrier sheet.


Comments