
Pet Placemat
- Create with RNK

- Aug 25, 2020
- 5 min read
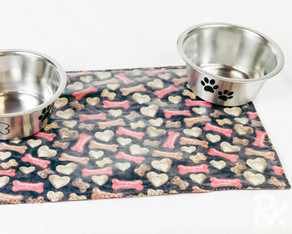
We all have fur-babies that we love, but do we love the mess they can create?

If your fur-babies are like mine, they make a MESS. When it's dinner time, there better be nothing and no one in their way because they're coming in HOT! Food flying everywhere, water being splashed like you're on the front row of Sea World, and the Swiffer Mop is doomed for the after math.
Clarrisa created the perfect way to have easy clean-up, adorable style, and a functional piece for you and your fur-baby! How about a waterproof pet placemat? Download your instructions below with examples of software or follow along in the video and steps listed.
Supplies:
· Floriani Total Quilter Software
· Various pieces of fabric for piecing- I found that pieces 12”x12” or 12”x9” were about what I needed for each piece
· Floriani Decorative Embroidery Thread or Floriani Standard Embroidery Thread
· Bobbin thread
· Floriani No Show Mesh Non Fusible- 4 hoopings in 200mmx300mm hoop
· Quilter’s Select Appli Stick or Embellish Foolproof Repositionable Webbing
· Digital Cutter (optional)
· Craft n Cut Software or Software for your digital cutter (optional)
· 1 ¼ yard of 20” wide Fusible Matte Vinyl
· 3/8th yard of fabric for back
· Teflon Pressure foot for your machine
· Open Toe Applique foot for your machine
· Standard Sewing thread to coordinate with your fabrics
· RNK Perfect Grip Tape
· Quilter’s Select Glue Stick
· 1” wide Wet n Stick Tape
· 90/14 Chrome Microtex needle
Create Appli Quilt Block:
1. You will be using Floriani Total Quilter to prepare your Appli Quilt Block. Watch attached video for a software lesson on how to create your design. You will need to create a block that is 6”x11”.
2. Once you save your design in Total Quilter it will save multiple files. The main files you need are the SVG files for cutting if you choose to cut your pieces with a digital cutter and an embroidery file for stitching the placement lines and connecting stitches.
Cutting out your pieces:
1. You will use the SVG files generated when you exported the Appli-Quilt block in Total Quilter to cut out your pieces.
Before cutting your pieces you will apply Quilter’s Select Appli-Stick or Embellish Foolproof Reposition-able Webbing to each piece of fabric before cutting.
The pieces may be cut using a digital cutter or you can check in the print options “For Manual Cutting” at the bottom of the Export Window in Total Quilter.The Export window comes up when you click the “Export AQ Quilt Block” icon.
To manually cut each piece-If you don’t have a digital cutter you will have checked “For Manual Cutting” and “Print Preview” in the Export Window. A window will appear for you to print a pattern for each piece. You also have options to print a picture of the entire block and the stitching order. I print the picture of the block but it’s up to you if you want to print the stitching order. I don’t find it necessary.
Before cutting your fabric, fuse Quilter’s Select Appli Stick or Embellish Foolproof Reposition-able Webbing to the back of each piece of fabric.
Since we are making 4 blocks, it would be best to cut all pieces at once. If you have digital cutting software it’s easiest to put multiples together in your software. This is a picture from Floriani Craft n Cut software with multiple pieces on the cutting mat. Save this file as an SVG file and cut with your digital cutter.
TIP- I Love Craft n Cut software as it takes the guesswork out of cutting. Craft n Cut has a feature called “Save 2 Cut”. Select “Save 2 Cut” when saving your design and a window will come up instructing you on how to set your cutter for the type of material you are cutting and brand of cutter you are using.
If you don’t have digital cutting software you will have to load multiples into your cutter and arrange them on the screen of your cutter.
Embroidery:
1. To keep the No Show Mesh from slipping in the hoop, I like to wrap the long side of my inner hoop with RNK Perfect Grip Tape. It is purple on the hoop in the following pictures.
2. Hoop a single layer of Floriani No Show Mesh.
3. The embroidery design exported from Total Quilter will embroider a placement line.Each step in the Appli Quilt process is a different color change.You will use the same thread for the entire embroidery process.Stitch the first color which is the placement line.
4. Remove the hoop from the machine. With a stiletto or straight pin, score the paper on the back of each cut piece and place each piece in the appropriate place on the No Show Mesh.
5. Once all the pieces are placed, press the pieces down to adhere them well to the No Show Mesh. LEAVE IN HOOP.
6. Replace the hoop and stitch the decorative connecting stitches.
7. Remove from hoop and trim away the No Show Mesh along the edge of the fabric.
Construct the Placemat:
1. Lay the 4 blocks together in the positions you would like them.
2. Turn 2 blocks to the back keeping them together and stick a piece of Wet n Gone tape where they meet holding them together.We are butting the blocks next to each other instead of stitching a seam. Repeat for 2 additional blocks. Just tape and stitch 2 blocks at a time.
3. Turn blocks to the front. Thread your machine with your decorative thread on the top and bobbin. Insert 90/14 chrome Microtex needle. Attach your open toe foot.
4. Select a decorative stitch to stitch the 2 blocks together. Select a stitch that is as wide as your machine will stitch and make sure it’s not too dense.
5. Using your selected decorative stitch, stitch the 2 blocks together catching both blocks with the width of your stitch.
6. Tape and stitch all 4 blocks together.
7. Square up all 4 sides of the entire piece. Lay your ruler along one edge lining up the ruler with the top and bottom of that edge. Cut off any extending fabric. Repeat for all 4 sides.
8. Lay the connected 4 blocks (top) on top of the backing fabric and cut out backing fabric to match.
9. Cut 2 pieces of Vinyl about 1” larger all around than the 4 connected pieces (Top).
10. Follow the instructions that came with the Vinyl and fuse one piece of vinyl to the top and one to the back. BEFORE FUSING, trim off the extra vinyl around the edges.
11. Thread your machine top and bobbin with standard sewing thread. Attach teflon foot.
12. Place back and top right sides together and pin around the edges within the ¼” seam allowance.
13. Toward about the center of one long edge begin stitching off the fabric into the seam allowance and pivot at ¼” seam allowance and continue stitching. See photo. Leave about a 6” opening to turn. At each corner stitch 2-3 stitches across the corner and then pivot and stitch the next side.
14. Trim corners at a 45 degree angle curving around the corner.
15. Turn right sides out and using the RNK Turning Tool push the corners out. They won’t be too square as we stitched the 2 stitches in each corner. Finger press seam allowances to one side and fold along seam line. DON’T PRESS THE VINYL.
16. Run a line of Quilter’s Select glue INSIDE along one open edge. Turn the ¼” seam allowance onto the glue. Repeat for other edge.
17. Set your machine for a wide and long zig zag. I set mine for 7 and 7.
18. Zig Zag around the entire edge of the placemat holding the opening edge together while you stitch. Don’t pull as you stitch. You may have to pull a little from behind to keep things moving forward.


Comments