
The Why and How of 12 Weight Thread
- Create with RNK

- Apr 17, 2023
- 3 min read
Updated: Jun 8, 2023
I love taking plain fabric and elevating the look of it with colorful thread work. Hi, I’m Susan with sewfeet.com and in today’s post I’m going to share an easy fabric embellishment that has a lot of impact, simply because I didn’t use “normal” sewing thread. What I used was Floriani 12-weight polyester embroidery thread in the needle and Quilters Select 80 weight cotton polyester thread in the bobbin. Keep reading for tips on using these two threads together to add a layer of color and texture over the surface of your fabric.
Thread

If you compare the 12-weight polyester embroidery thread to typical sewing/embroidery threads, which are 40 to 50 weights, you’ll see that the 12-weight is much thicker and gives you bolder stitches that will be more prominent on your fabric. The 80-weight bobbin thread is a very lightweight thread that is made with a mix of cotton and polyester. The lighter weight bobbin thread reduces the build-up of heavy thread on the back of your fabric and creates seams that are flatter than if you were using a heavier thread in the bobbin. The photo below shows these two threads side by side so you can see the difference in their weights.
Needle Options

When using a 12-weight thread, you definitely need to use an appropriate needle. I like to use a topstitch needle because the eye is elongated, and the heavier thread can easily move through it with little stress as you stitch. The size of the needle should be 90/14 or 100/16. Using a size smaller than these results in frayed and/or broken threads.
Presser Foot

The thing to consider when you are selecting a presser foot for stitching with 12-weight thread is the sole of the foot. There must be room for the heavy thread to easily move under the foot without dragging, which can cause distorted or malformed stitches. An open embroidery foot is a good choice because it has a wide indentation on the sole, so the thread moves easily under it. An all-purpose foot has a sole that is almost flat so the 12-weight thread would not have room to move smoothly under it.
Thread Tension
When sewing with 12-weight thread, you need to consider the thread tension. Because of the disparity of the thread weights, you may have to make a needle tension adjustment to balance the stitch. If you see the bobbin thread showing on the top of the fabric (usually looks like a series of dots), it means the needle thread tension is pulling it up because it is too tight. The needle tension should be decreased (lower number) until the bobbin thread no longer shows on top of the fabric. If the needle thread shown on the bottom fabric, then increase the needle thread tension (higher number) until the stitch is balanced, which means the two threads meet in the middle between the two layers of fabric. Some computerized sewing machines automatically adjusts the tension to suit the thickness of your thread.

Stitching The Fabric

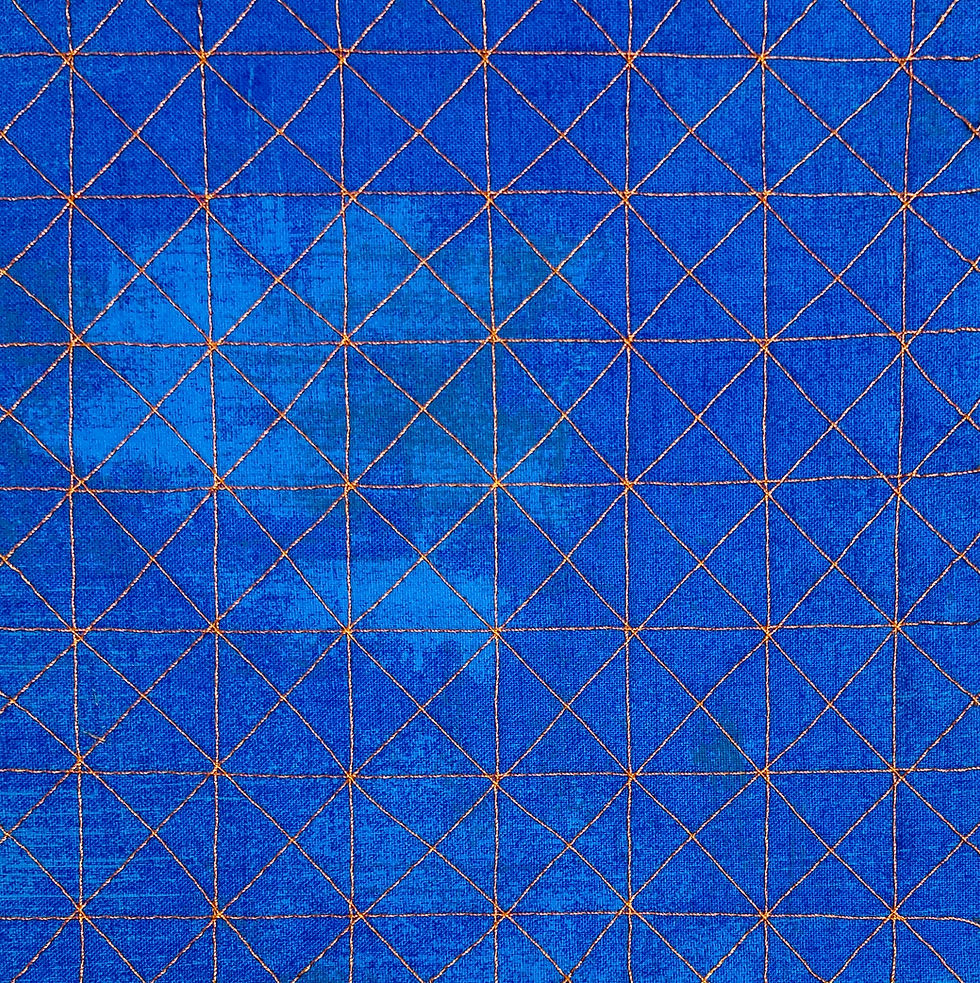
Before stitching, make sure your fabric is well-stabilized. You can use fusible interfacing and/or a removeable stabilizer. Sew a few test lines of stitches to see what works best for your fabric. This embellishment is very simple – all straight stitching. What makes it special is that it is made up of four sets of evenly spaced lines. The first two are vertical and horizontal lines spaced 1” apart to form a square grid. You can mark the lines on the fabric and then stitch over them. Or you can eliminate the marking and use a seam guide attached to your presser foot. Because the 12-weight thread is thick, you may want to lengthen the stitch length to 3 mm-3.5 mm. The gives the stitches more definition and lets them lay flat instead of bunching together.

Before stitching, make sure your fabric is well-stabilized. You can use fusible interfacing and/or a removeable stabilizer. Sew a few test lines of stitches to see what works best for your fabric. This embellishment is very simple – all straight stitching. What makes it special is that it is made up of four sets of evenly spaced lines. The first two are vertical and horizontal lines spaced 1” apart to form a square grid. You can mark the lines on the fabric and then stitch over them. Or you can eliminate the marking and use a seam guide attached to your presser foot. Because the 12-weight thread is thick, you may want to lengthen the stitch length to 3 mm-3.5 mm. The gives the stitches more definition and lets them lay flat instead of bunching together.
Extra Embellishment
Here’s an extra embellishment for this fabric. It’s a little time consuming but I love it! Once your grids are stitched, sew a mini button at each of the intersections. Full disclosure: These buttons are not sewn on. I was playing around with the buttons and took a photo to show you how cute it is!


FANTASTIC article!!! I was finally able to use my 12 wt thread with this advice. I've tried so many ways to use it and could never get it to sew without immediately frying and snapping. I just thought my machine didn't like it. Now I know how to get it to sew, for the first time. Thank you so much!